We built a thing again!
Some of you long-time readers may remember that Bryan and I got into building furniture five years ago with a queen bed headboard. Since then, we’ve built an entry table, dining table, and an entry bench. It’s been a few years since we’ve built anything new. However, we have been in our current home over three years and have one extra bedroom that was lacking in furniture and has been used for storage. Over the holidays, it was decided that we would indeed be utilizing that room and turning it into a project room. The room already had a spare tv sitting on the floor, so we moved a low bookcase in and put the tv on top of it. We also had an extra accent chair that we dragged in to provide some seating (I’m still missing a chair for that room).
I mentally wrestled with building a workbench type table for the room or buying a coffee table for it. I know that the project table is going to get some rough handling, based on the type of projects that Bryan has in mind, so I didn’t want something super nice which would get scratched up anyway. Bryan told me he preferred a coffee table (vs a desk) because he’d like it in the center of the room to face the tv.
The plan for the newest project was that we would build a coffee table and it would either:
A) Be crappy and we could use it in the project room, where it would get dinged up anyway or
B) Be nice enough that we could keep it in the family room.
I scoured the internet - where else - for a plan that I liked. I didn’t find anything on Pinterest or Ana White (where I typically get really great ideas). Finally I went on Instagram and lo and behold, searching via #diycoffeetable found a reel that a lady made where she walked through every step of her homemade coffee table. The table looked large, simple, yet modern and we could customize it to fit our space. Using her basis of design, we cut off about a foot of length and raised it two inches in height.
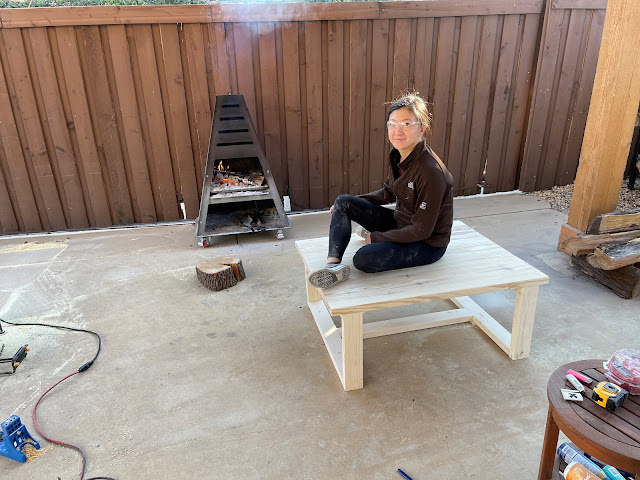
We picked a sunny afternoon a few weekends ago for construction. We grabbed some pine boards from Home Depot and set up our back porch for construction. By this point, we’re getting pretty adept at our woodworking projects. One of our biggest failings is that we don’t have a garage and thus, have nowhere to store your typical large tools, like a table saw or a wood planer. So we do the best we can!
As soon as Bryan cut the pieces to size, I got to sanding (pre-assembly) using my handy dandy orbital sander. And I sanded and sanded and sanded. One of the planks we purchased for the table top had a slight hump at the end due to the grain, so I sanded until that thing was flat. The entire back patio was covered in a thin layer of sawdust after I was finished. After sanding, we attached the pieces with pocket holes using the Kreg Jig. And then we realized how heavy this table was. We had to bring it inside, as the weather forecast was calling for rain and it was also going to get really really cold. It was a two person job to bring inside the house but I’m glad we brought it in to dry in the heat before staining.
 |
| Finally done sanding, exhausted, and covered in sawdust |
The next dilemma was the stain / colour for the table. In the spirit of being consistently inconsistent, all of the pieces we’ve built have used different stains. The bench and dining table are closest in colour but I didn’t want the yellow/orange hue typically comes out when you stain pine. I found a magical thing called a wood accelerator online by Varathane (our Home Depot didn’t carry it). I'm going to call it "stain" since that's shorter to type than "wood accelerator." It is a water-based stain (less odorous) and reacts with the tannins in the wood. It also dries incredibly quickly - within an hour. I also purchased a satin water-based poly to seal everything when done.
 |
| Table after one coat of wood accelerator |
Well, good thing the stain was water-based, as I was doing the staining inside on carpet that was covered with a tarp. The stain gives the option of either applying it a thin coat and leaving it or applying and wiping it immediately for a lighter colour. I applied with a foam brush in thin layers. One of the things I learned through the process is that with a water-based stain, drip marks are VERY visible so make sure those are wiped off immediately. I messed up a few areas that were really apparent and was able to sand off the stain and reapply. The other thing I learned was that water-based stains flick droplets really easily - whoops. Again, luckily it’s water-based and cleans up easily with soap / water on carpet. I believe I did three layers of stain (I’ve forgotten already) and then around 10 layers of the water-based poly. Both the stain and poly are pretty low odor but not completely odorless, so a fan is helpful for air circulation.
 |
| Finished product! |
And now we’re done! It looks good enough to sit in our family room and isn’t precious enough that we can’t put our feet on it. Bryan has plans to secure another cross piece across the bottom of the table top to remove all the wiggles (it barely moves) but the table will definitely survive without it. Another successful project completed!


What an awesome project, Ruth, and it turned out so great! Thanks for sharing all the steps you guys did:) Learned something new about stains!
ReplyDeleteThanks, we had a fun time working on it and are really enjoying the new table so far!
DeleteI love it!! You really need to start selling your things.
ReplyDeleteHa! We may have to get a proper shop - but that'd be so fun
DeleteAhhhh! I didn't know you guys build, make, create furnitures!! It looks great Rooth!
ReplyDeleteXx